How to: woodstrips in your garden!
Major trend: Recycled wood in the garden
Recycled wood has been a big trend in recent years. It not only looks beautiful in your garden, but is also a very sustainable choice. Think, for example, of pallet wood that we see appearing in all kinds of shapes in the garden. From green walls, vegetable trays and benches to complete lounge sets. But you can also make the most beautiful creations in your garden from loose planks in different colors or different types of wood.
Wood strips are actually more or less the same idea. A big advantage of wood strip panels is that you buy them ready-to-use. That saves you a lot of carpentry and sawing. They are often also made of used wood with FSC mark. Good for the environment and a sustainable choice too. The look is the same as loosely placed thin wooden planks on a wall. The height differences create a 3D effect and such a wood strip wall looks very authentic and natural. And that is why the possibilities of wood strips in your garden are endless.
Mosaic patterns
The mosaic patterns in which wooden planks are painted in different colors are also very cool. You can use different types of wood or different colors of paint or oil for this. Would you like an aged look? Then sand them lightly or apply a special oil for an aged, white wash or smoked look. It is also nice to choose a different laying bond for the wood. Consider, for example, a herringbone or staggered laying bandage. This creates a fun and playful effect. Beautiful for your garden table, for example. However, do not attach this wood mosaic to a softer type of wood, as this can cause the top to warp.
The do’s and dont’s of wood strips in the garden
Among the garden materials we naturally find all kinds of wooden materials. How can you install these wooden fences, decking and planks in your (wet) garden without any problems? This is possible because they are usually made of hardwood. This type of wood is very hard and dense and therefore lasts almost a lifetime. It belongs to class 1 wood and has an average lifespan of 25 years or longer. Cheaper fences and planks are made from less durable woods. For that reason, this wood is impregnated with a special lacquer. For example, this wood often lasts for ten years or more in the garden. What are the options for wood strips in your garden? We have listed them for you below:
# 1 Hardwood wood strips on plastic panels
The best and most durable choice are hardwood wood strips. A slightly more expensive choice, of course, but that way you can be sure that the wood will last a long time (especially in our wet country). Always choose wood strips that are attached to plastic or hardwood panels. Panels made of softer woods absorb moisture and swell and warp. This is not a good idea. Keep in mind that hardwood will age. Is that not your style? Then treat the wood with a good quality Teak or Bankirai oil. The types of hardwood you can use are:
- Teak
- Iroko
- Sipo
- Mahogany
- Ipé
- Merbau
- Solid Bamboo
- Merbau
- Jatoba
# 2 Wood strips of a softer type of wood & sustainability
Is it absolutely not done to choose a cheaper, softer wood type for your garden? No, of course not. After all, fences and wooden garden planks are also made of these cheaper, softer woods. You have to make the wood more sustainable or impregnate it. This gives the wood the same durability as the garden wood in a DIY-store. We will explain how to do this later on in this article. Examples of softer woods are:
- Douglas
- oak
- ash
- walnut
- Wenge
# 3 Stone wood strips
Last but not least: stone wood strips are also a very good choice for your garden. And to the eye they look the same as real wood strips. They can hardly be distinguished from natural wood. The big advantage is that these ceramic wood strips are completely maintenance-free.
Impregnating wood strips & making them more sustainable
Wood can be made resistant to moisture in many ways. We also call this preservation or impregnation. The wood therefore lasts much longer. Just like the impregnated garden wood at any DIY-store. Did you know that you can make the wood almost completely waterproof with the new nano-technology-based products? These products are also environmentally friendly, transparent and water-based. You can easily apply them with a brush, roller or paint sprayer. The nano molecules adhere to the wood and make it water-repellent. This prevents the water from penetrating into the wood. So it stays on top of it and the wood lasts much longer.
Impregnating preparations for wood
Personally, we are fans of Woodseal Pro. Why? This agent is environmentally friendly, easy to apply and makes the wood very waterproof. In terms of types of impregnating agents, you have the choice of surface coating or an impregnating or penetrating coating. The latter penetrates into the wood and protects from the inside-out. You apply a coating on the outside and form a protective layer. The disadvantage of a coating is that a small damagement can cause a leak and it could possibly cause ugly spots and wood rot. Examples of coatings are:
- Paint
- Varnish
- Lacquer
Examples of impregnating coatings are:
- Stain
- Oil
- Impregnating
- Wood Sealer
Not all stains have a moisture-resistant effect. They are available on an oil, water and alcoholbasis. Oil really only provides temporary protection for the wood. Another disadvantage of all these coatings is that you usually have to remove them completely first. Only then can you apply a new coating. A job for the enthusiastic hobbyist.
Impregnating wood makes it greenish in color. It protects the wood from fungus and insects, but not moisture. Wood sealers have a combination of all these properties. They penetrate deep into the wood and protect it from moisture, mold and dirt. You only need to apply one layer and the wood can withstand anything for years to come.
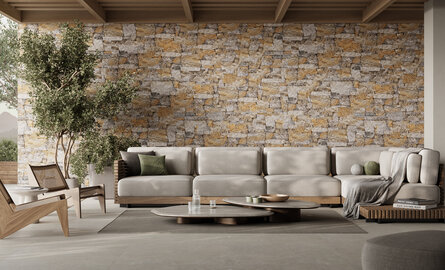
Inspiring ideas for a dream garden with wood strips
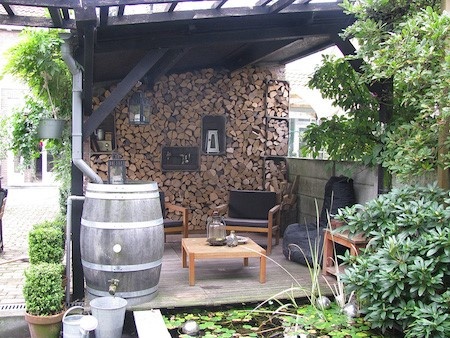
# 1. An accent wall in your garden pavilion
Open garden pavilions are a big trend at the moment. Ideal for our rainy country. Add a fireplace and you can sit outside any time of the year. It is a nice to place add an accent wall against the back wall. Position the pavilion so that you can look out on the accent wall from your living room.
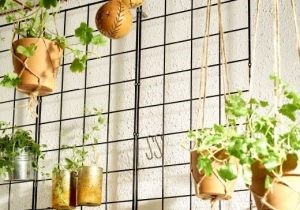
# 2. Wire rack against wood strip wall
Would you like to add a nice industrial accent to your wood strip wall? Then place a black metal wire rack in front of it. Great fun because you can also hang all kinds of loose plants on it. Place the accent wall close to your living room so you can enjoy it all year round.
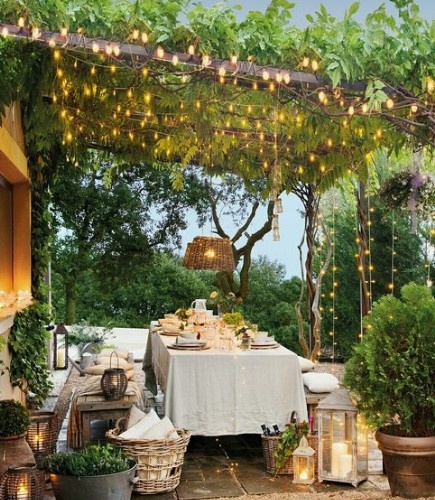
# 3. Pergola, LED lightstrips & woodstrip wall
Wood on wood always provides a reinforcing effect. Place an accent wall with wood strips next to your pergola for a nice accent. You can assemble all this in a weekend (with the right preparation). Hang some LED lightstrips over the roof your pergola, a few climbing plants against it and voilà: your dream garden is ready!
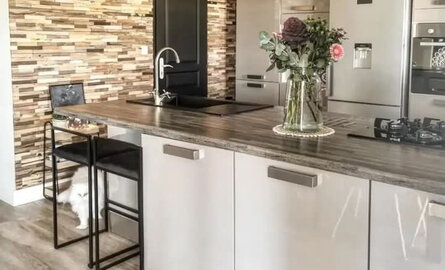
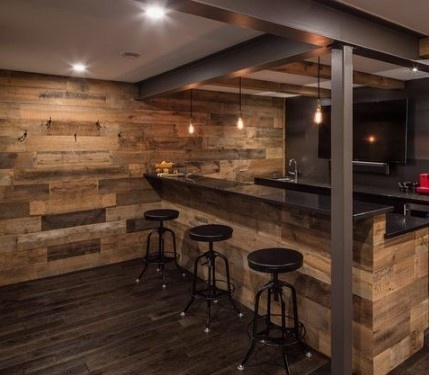
# 4 Outdoor kitchen with wood strips
Another big trend: the outdoor kitchen. It does not matter whether you only have a covered outdoor bar or barbecue or a fully equipped kitchen pavilion. With wood strips around the bar or as walls in your outdoor kitchen you immediately have a beautiful natural (and industrial) atmosphere.
# 5 Vintage look wood strip wall with colors
Do you really want an original look for your wood strip wall? Then paint some slats with colored paint or oil here and there. You can then sand them lightly for an aged look. Combine the accent wall with plants with large leaves and anthracite-gray tiles or garden furniture. We are willing to bet that this will create a wow effect in your garden!

How to mount woodstrips in the garden
It is incredibly cool that nowadays there are wood strip panels for sale that are also suitable for your garden. They are attached to a plastic mat so you can place them outside without any issues. Amazing a green wall or a nice accent wall, for example. You can read how to install wood strips in our article: renovating a bathroom: one weekend make over.
Of course, there are a few extra rules for the garden:
- First let the wood acclimate in a dry place outside for a while. This way it can dry and come up to the right temperature. It can take a few weeks before it is really dry.
- Don't be too thrifty with sealant when assembling wood strip panels. Just keep the sealant away from the edges so that it doesn't get in between. Also buy a good waterproof sealant that is suitable for outdoors.
- Always check that everything is level. The wood strip panels can have small differences in dimensions.
- Always impregnate the wood with a good wood sealer. That way it is optimally protected against moisture. And even if you have bought hardwood wood strip panels, impregnation is still a good idea. The wood stays beautiful for much longer and is optimally protected against dirt and moisture thanks to nanotechnology. The water remains on top of the wood and does not penetrate it.
- Hardwood, as the name suggests, is quite hard. Are you having problems turning the screws into the Teak wood strip panels? Coat them in advance with petroleum jelly.
- When making wooden containers, always place double root cloth on the inside so that you staple firmly on the inside.
- Do you want to install wooden panels as a decking terrace? Always check whether the panels of your preference are suitable for this. Most wood strip panels are only suitable as walls. In this case it is also important that the wood strips are attached to plastic mats.And in this case, be sure to choose hardwood. For a decking terrace, make a frame of hardwood beams on two layers of root cloth. You attach the wooden planks or panels to this frame. Then, as always, treat the wood with a good wood sealer.
- Always keep some space (3mm) between the panels in connection with the functioning of the wood.
- Keep in mind that wood gets slippery in the garden. So always choose wood with a profile or a type that is slightly rough, if you wish to install it as flooring.
- When making a wooden accent wall, always place the wood strip panels 3 centimeters above the ground to prevent wood rot. This prevents rain moisture from rising up into the panels.